Hazard Perception: What to Expect and How to Score Well on the Test
The hazard perception test can feel like one of the trickiest parts of your driving theory exam, but we’re here to change that. This crucial assessment measures how quickly you can spot potential dangers on the road, from pedestrians stepping into traffic to cars pulling out unexpectedly. To score well on hazard perception, you need to click at the right moment when a hazard develops into something that requires you to change speed or direction.
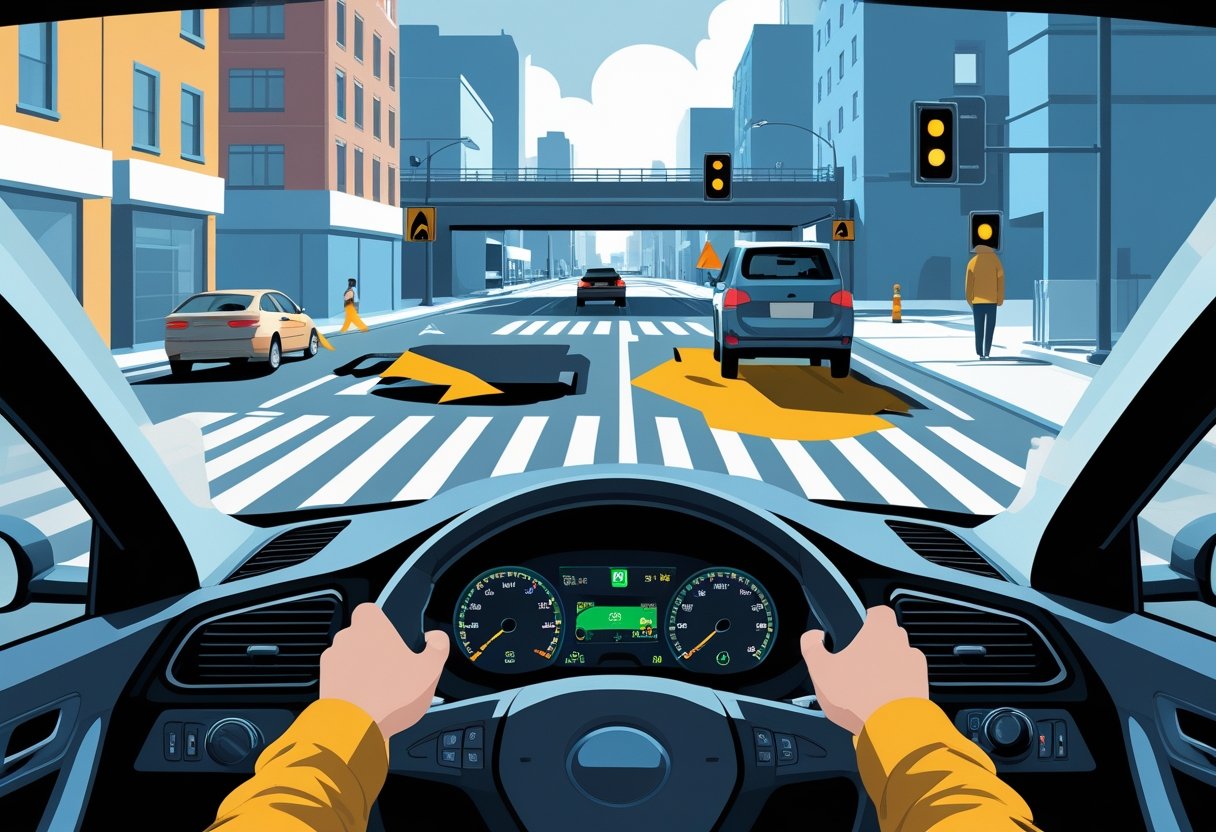
Understanding what the test involves makes all the difference to your performance. You’ll watch 14 video clips from a driver’s perspective, each containing at least one developing hazard that could affect your journey. The key isn’t just spotting these hazards, but recognising the exact moment they become something you’d need to react to in real life.
We’ll walk you through everything from the types of hazards you’ll encounter to the specific skills that separate high scorers from those who struggle. By the time you finish reading, you’ll know exactly how the scoring system works, what strategies help you pass the hazard perception test with confidence, and how to prepare effectively for test day.
What Is Hazard Perception?
Hazard perception involves spotting potential dangers on the road before they become serious problems, whilst hazard awareness helps you understand how these situations develop and what actions you might need to take.
Understanding Developing Hazards
A developing hazard is any situation that could require you to change speed, direction, or stop completely. Think of it as a potential problem that’s starting to unfold.
Common developing hazards include:
- Pedestrians stepping towards the road
- Cyclists wobbling or moving into your path
- Cars pulling out from side roads
- Animals near the roadway
- Weather conditions affecting visibility
The key word here is developing. We’re not looking for static objects like parked cars or road signs. Instead, we focus on situations that are changing and could affect your driving.
Your hazard perception skills improve with practice. The better you become at spotting these situations early, the more time you have to react safely.
Most learners find it helpful to scan the entire scene continuously. Look for movement, unusual behaviour, or anything that seems out of place.
The Role of Hazard Awareness in Safe Driving
Hazard awareness goes beyond just spotting dangers. It’s about understanding why certain situations develop and predicting what might happen next.
When you develop strong hazard awareness, you start anticipating problems before they occur. You might notice a child’s ball rolling into the road and expect the child to follow.
This skill becomes crucial during your hazard perception test, where you’ll watch video clips and click when you spot a developing hazard.
Good hazard awareness helps you:
- React faster to unexpected situations
- Make better driving decisions
- Stay calmer under pressure
- Protect yourself and other road users
The brilliant thing about hazard awareness is that it becomes second nature with time. Experienced drivers constantly scan for potential problems without even thinking about it consciously.
Inside the Hazard Perception Test
The test presents you with 14 video clips where you’ll spot developing hazards by clicking your mouse at the right moment. You need to score at least 44 out of 75 points to pass, with timing being everything for your success.
How the Test Works
The hazard perception test forms part of your driving theory test and comes after you’ve completed the multiple choice section. You’ll sit at a computer screen watching real-life driving scenarios filmed from a driver’s perspective.
Each clip lasts about one minute. Your job is to click the mouse when you spot a hazard that might cause you to change speed, direction, or stop.
The test uses 14 clips total. Thirteen clips contain one developing hazard each, whilst one clip contains two hazards.
What counts as clicking:
- Left mouse button
- Right mouse button
- Both buttons pressed together
You can’t pause or rewind the clips. Once a clip starts, you’re committed to watching it through to the end.
The DVSA uses sophisticated software to detect clicking patterns. If you click randomly or too frequently, you’ll score zero for that clip.
Format and Scoring Explained
Your score depends entirely on how quickly you respond after a hazard starts developing. The UK hazard perception test scoring system awards points based on reaction time.
Points awarded per hazard:
- 5 points: Click within 0.5 seconds of hazard developing
- 4 points: Click within 1 second
- 3 points: Click within 1.5 seconds
- 2 points: Click within 2 seconds
- 1 point: Click within 2.5 seconds
- 0 points: Click after 2.5 seconds or not at all
The maximum possible score is 75 points (15 hazards × 5 points each). You need 44 points to pass, which is roughly 60% of the total.
Timing windows matter hugely. Click too early before the hazard develops and you’ll get zero points. Click too late and you’ll miss the scoring window entirely.
Each hazard has a specific development phase when clicking counts. Outside this window, your clicks won’t register any points.
Common Scenarios on Test Clips
The clips feature everyday driving situations that every learner driver will encounter on real roads. We’ve seen these scenarios appear repeatedly in hazard perception test practice sessions.
Pedestrian hazards:
- Children playing near the road
- People stepping out between parked cars
- Pedestrians at zebra crossings
- Dog walkers with unleashed pets
Vehicle-related hazards:
- Cars pulling out of side roads
- Vehicles changing lanes suddenly
- Cyclists wobbling or turning
- Motorcycles overtaking dangerously
Road condition hazards:
- Wet or icy surfaces affecting grip
- Sharp bends with limited visibility
- Narrow bridges or roadworks
- Parked cars creating blind spots
The key is recognising when a potential hazard becomes a developing hazard. A parked car isn’t a hazard, but a parked car with someone getting into it becomes one.
Weather conditions often feature in clips. Rain, snow, or bright sunlight can create hazards that require you to adjust your driving.
Remember, you’re looking for hazards that would make a careful driver slow down, change direction, or stop completely.
Types of Hazards You’ll Encounter
Understanding the various hazards that appear in your test will boost your confidence and reaction times. We’ll explore different road users, unpredictable pedestrian behaviour, challenging weather conditions, and common everyday situations that require your attention.
Road Users and Their Influence
Other vehicles create some of the most common hazards you’ll face during your test. Cars pulling out from junctions without proper observation can quickly develop into scoring opportunities.
Motorcycles and cyclists deserve special attention. They’re smaller and can appear suddenly from blind spots. Watch for motorbikes overtaking or filtering through traffic.
Large vehicles like lorries and buses present unique challenges. They have bigger blind spots and need more space for manoeuvring. When you spot a bus at a stop, expect passengers to emerge and possibly cross the road.
Emergency vehicles create instant hazards. Ambulances, fire engines, and police cars can appear quickly, forcing other road users to react suddenly. Listen for sirens and watch for flashing lights in your peripheral vision.
Key vehicle hazards to watch for:
- Cars reversing from driveways
- Vehicles changing lanes without indicating
- Delivery vans making sudden stops
- Tractors moving slowly on rural roads
Pedestrians and Unexpected Movements
Pedestrians create some of the most unpredictable hazards in your test clips. Children are particularly challenging because they move without warning and often appear from between parked cars.
Adults can be just as unpredictable, especially when distracted by mobile phones or conversations. Watch for people walking close to the kerb or carrying shopping bags that might drop into the road.
Elderly pedestrians often move more slowly but may struggle with balance or awareness. They might hesitate at crossings or change direction unexpectedly.
Special situations require extra vigilance. School zones during busy periods create multiple pedestrian hazards. Shopping areas and high streets present constant movement challenges.
Common pedestrian scenarios:
- People stepping off pavements without looking
- Joggers running along road edges
- Dog walkers with pets on long leads
- Groups of people outside pubs or restaurants
Look for early warning signs like people gathering near road edges or pointing across streets.
Environmental and Weather Hazards
Weather conditions significantly affect how hazards develop in your test clips. Rain creates slippery surfaces and reduces visibility for everyone on the road.
Bright sunlight can blind drivers temporarily, causing sudden braking or swerving. Low winter sun is particularly dangerous during morning and evening hours.
Wind affects high-sided vehicles like lorries and caravans. Strong gusts can push them into other lanes without warning.
Road surfaces change throughout the year. Autumn leaves become slippery when wet. Ice patches in winter create instant stopping challenges for all vehicles.
Weather-related hazards include:
- Puddles causing vehicles to aquaplane
- Fog reducing visibility dramatically
- Snow forcing sudden speed reductions
- Flooding making roads impassable
Construction work and temporary road signs create additional environmental challenges. Narrow lanes and contraflow systems force traffic into unusual patterns.
Potential Hazards on Everyday Roads
Some situations haven’t developed into immediate dangers yet but could quickly change. Understanding different hazard types helps you spot these developing situations early.
Parked cars create multiple potential hazards. Doors might open suddenly, or vehicles could pull out without proper observation. Children often play between parked cars in residential areas.
Traffic lights and junctions present constant potential for hazards. Amber lights cause drivers to make split-second decisions about stopping or continuing.
Roundabouts challenge many drivers. Watch for vehicles in the wrong lanes or drivers who don’t understand priority rules.
Everyday potential hazards:
- Ice cream vans attracting children
- Funeral processions moving slowly
- Road works with temporary signals
- Animals in rural areas
Common types of hazards often develop from seemingly normal situations. A pedestrian walking normally becomes a hazard when they suddenly step into the road.
The key is recognising when potential hazards are about to become actual dangers. Your clicking timing depends on spotting this exact moment of development.
Essential Hazard Perception Skills
Mastering hazard perception requires developing sharp observation abilities, lightning-quick reflexes, and the mental composure to make split-second decisions. These core competencies work together to keep you and other road users safe whilst helping you achieve a strong test score.
Scanning and Anticipation Techniques
Your eyes are your most powerful tool for spotting potential dangers before they become serious hazards. We recommend developing a systematic scanning pattern that covers the entire road environment, not just the vehicle directly ahead.
Start with the distant view and work your way closer. Check what’s happening 12-15 seconds ahead, then gradually focus on the mid-range and immediate surroundings. This layered approach helps you catch developing situations early.
Look for visual clues that signal trouble ahead:
- Brake lights appearing suddenly
- Pedestrians hovering near kerbs
- Children playing near roads
- Parked cars with people inside
- Traffic bunching up ahead
Pay special attention to junction areas, pedestrian crossings, and school zones. These locations are hotspots for unexpected movements. Watch for cyclists emerging from side roads or pedestrians stepping between parked cars.
Practice the commentary drive technique during your lessons. Narrate what you see happening around you, including potential risks. This builds your awareness muscles and helps you spot patterns that often lead to hazardous situations.
Improving Reaction Time
Quick reactions can mean the difference between a near miss and a collision. The good news is that reaction time improves significantly with practice and proper preparation.
Physical fitness plays a bigger role than most people realise. Regular exercise, adequate sleep, and good nutrition keep your reflexes sharp. Even mild dehydration can slow your response time by precious milliseconds.
During the test, position your mouse finger correctly. Rest it lightly on the left mouse button without applying pressure. This ready position eliminates the extra split second needed to locate and engage the button when a hazard appears.
Avoid the common mistake of clicking too frequently. The system penalises rhythmic clicking or excessive responses. Instead, focus on genuine developing hazards that would require you to change speed or direction.
Practice with online hazard perception clips regularly. This familiarises you with the types of situations you’ll encounter and helps calibrate your timing for optimal scoring.
Staying Calm Under Pressure
Test nerves can severely impact your hazard perception performance. When anxiety kicks in, your vision narrows and you miss important details happening in your peripheral vision.
Use controlled breathing to maintain composure throughout the test. Take slow, deep breaths between video clips to reset your focus. This simple technique prevents the buildup of tension that clouds your judgement.
Remember that you cannot pause or replay the video clips, just like real driving. Accept this constraint and focus on what’s happening now rather than worrying about hazards you might have missed.
Develop a pre-test routine that puts you in the right mindset. Arrive early, review key techniques briefly, and remind yourself that you’ve prepared well. Confidence in your abilities translates directly into better hazard recognition and timing.
If you spot a potential hazard but aren’t certain, trust your instincts. Your subconscious often picks up on subtle cues before your conscious mind processes them fully. The worst outcome is missing a hazard entirely, not clicking slightly early or late.
Top Strategies to Score Well
Scoring well on your hazard perception test comes down to smart practice, perfect timing, and steering clear of the mistakes that trip up most learner drivers. The DVSA awards points based on how quickly you spot developing hazards, so mastering these three areas will dramatically boost your chances of hitting that crucial 44-point pass mark.
Effective Practice Methods
Start with official DVSA practice clips before moving to third-party resources. The official materials mirror exactly what you’ll face on test day, giving you the most accurate preparation possible.
We recommend practising in short, focused sessions rather than marathon study periods. Twenty minutes of concentrated practice beats two hours of half-hearted clicking every time.
Mix up your practice environment to build real confidence. Try practising at different times of day and in various lighting conditions. This prepares you for the actual test centre atmosphere.
Study real-world hazards whilst you’re a passenger in a car. Call out potential dangers as they develop: pedestrians stepping towards the kerb, cars pulling out of side roads, cyclists wobbling near parked vehicles.
Focus on identifying the moment a hazard starts developing, not when it becomes obvious. A child playing near the road edge becomes a hazard the instant they move towards the carriageway, not when they’re already stepping into traffic.
Keep a practice log tracking which types of hazards you consistently miss. Most learner drivers struggle with subtle hazards like distant pedestrians or vehicles emerging from far-off junctions.
Timing Your Clicks Wisely
The hazard perception scoring system rewards early detection, awarding up to 5 points for clicking within the first window of hazard development.
Click the moment you think “I might need to slow down or change direction” because of what you’re seeing. This captures the DVSA’s definition of a developing hazard perfectly.
Don’t wait for hazards to become completely obvious. By the time a pedestrian is halfway across your path, you’ve missed the highest-scoring window entirely.
Space your clicks thoughtfully throughout each video. Most clips contain hazards that develop around the 30-60 second mark, but some appear earlier or later.
Avoid clicking more than 5 times per video. The system flags excessive clicking as cheating, which results in automatic failure regardless of your actual hazard spotting ability.
Practice the “commentary driving” technique during your lessons. Narrating potential hazards aloud trains your brain to spot them faster during the silent test environment.
Avoiding Common Mistakes
Never click in patterns or rhythms, even if you’re nervous. The computer detects regular clicking patterns instantly and will zero your score for that clip.
Don’t panic if you think you’ve missed a hazard. You won’t lose points for incorrect clicks, and most videos contain obvious backup hazards for learner drivers who miss the subtle ones.
Avoid the “kitchen sink” approach of clicking frantically at everything that moves. This includes parked cars, static pedestrians on pavements, and vehicles travelling normally in their lanes.
Stay alert during the full 60 seconds of each clip. Many learner drivers switch off after spotting one hazard, missing the second hazard that appears in one of the 14 videos.
Don’t second-guess yourself during the test. If something makes you think about adjusting your driving, click confidently and move on to scanning for the next potential danger.
Remember that clicking too often will cause you to fail as the computer cannot distinguish your genuine hazard spots from random clicks.
Preparing for Test Day
Getting ready for your hazard perception test means practising with the right materials and building your confidence. The DVSA provides official resources that mirror the real test experience, whilst specific techniques can help calm your nerves before the big day.
Using Official Practice Materials
The DVSA Theory Test Kit app gives you the most accurate practice experience possible. This official app contains genuine hazard perception clips that match what you’ll see on test day.
You can also find official DVSA hazard perception clips through GOV.UK and trusted platforms. These clips use the same scoring system as your actual driving theory test.
Practice daily for best results. Short 15-minute sessions work better than cramming for hours. This builds your reaction speed naturally.
Focus on different hazard types during practice:
- Pedestrians stepping into the road
- Cyclists weaving between traffic
- Animals near rural roads
- Weather conditions like rain or fog
- Road signs warning of dangers ahead
The official materials teach you to spot developing hazards early. This timing is crucial because clicking too soon or too late affects your score.
Building Confidence Before the Test
Get plenty of sleep the night before your test. A rested mind reacts faster to hazards on screen.
Arrive at the test centre 30 minutes early. This gives you time to settle your nerves and familiarise yourself with the surroundings.
Bring your provisional licence and any other required documents. Double-check you have everything the night before to avoid last-minute stress.
Practice relaxation techniques like deep breathing. Take three slow breaths before each clip starts to centre yourself.
Remember that you need 44 points out of 75 to pass. You don’t need perfection, just consistent hazard spotting.
Trust your practice. If you’ve been scoring well on official materials, you’re ready for the real test. Many learner drivers pass on their first attempt with proper preparation.
Keep a positive mindset. The hazard perception test measures skills you’ll use every day as a driver, so you’re learning valuable safety habits.
Frequently Asked Questions
Many learner drivers have similar concerns about maximising their test performance and understanding the scoring system. These practical tips will help you develop sharper observation skills, react quickly to hazards, and stay calm under pressure.
How can I sharpen my observation skills to excel in the hazard perception test?
We recommend practising daily with short, focused sessions to boost your reaction time and awareness. Regular practice helps your eyes learn to scan the entire screen systematically rather than focusing on one area.
Start by watching each scenario twice. The first time, watch naturally without clicking. The second time, actively look for hazards and practise your timing.
Pay attention to pedestrians near road edges, cyclists in your peripheral vision, and vehicles emerging from side roads. Weather conditions like rain or fog also create additional hazards you’ll need to spot quickly.
We suggest using official DVSA resources and reputable practice platforms to familiarise yourself with real test scenarios. The more exposure you have to different situations, the sharper your instincts become.
What’s the secret to reacting to potential hazards in the nick of time?
Timing is everything in hazard perception. We find that clicking too early or too late both result in zero points, so you need to identify that sweet spot when a hazard starts developing.
Watch for subtle changes in the scenario. A pedestrian stepping towards the kerb, a car’s brake lights illuminating, or a cyclist wobbling are all early warning signs that something might happen.
Don’t wait until a hazard becomes obvious to everyone. The test rewards you for spotting dangers as they begin to develop, not when they’re already happening.
We recommend clicking when you first notice a potential problem forming. Trust your instincts rather than second-guessing yourself, as overthinking often leads to delayed reactions.
In what way do weather conditions influence the hazard perception test scenarios?
Weather creates unique challenges that change how hazards develop and appear on screen. Rain reduces visibility and makes road surfaces slippery, which means vehicles might brake suddenly or skid unexpectedly.
Fog scenarios limit your viewing distance significantly. Pedestrians and vehicles can appear suddenly from the mist, giving you less time to react than in clear conditions.
Bright sunshine creates glare and strong shadows that can hide pedestrians or cyclists. We’ve noticed that hazards often emerge from these shadowy areas in test clips.
Snow and ice scenarios typically involve vehicles losing control or struggling with traction. Watch for cars sliding at junctions or pedestrians slipping on icy pavements.
Can you give me some pointers on distinguishing between developing and actual hazards?
A developing hazard shows early warning signs but hasn’t yet created immediate danger. This might be a child playing near the roadside or a parked car with its engine running and indicators flashing.
An actual hazard requires immediate action from you as the driver. Examples include a pedestrian stepping into your path or a vehicle pulling out directly in front of you.
We find that successful candidates click when they spot the developing stage. This demonstrates genuine hazard awareness rather than simply reacting to obvious dangers.
Look for body language and vehicle behaviour cues. A person looking towards the road while walking suggests they might cross. A car edging forward at a junction indicates the driver might pull out.
What type of scoring system is used in the hazard perception test, and how can I maximise my points?
The test uses a sliding scale that awards maximum points for early detection and fewer points as time passes. You can score between zero and five points per hazard, depending on your reaction timing.
Each clip contains one hazard worth up to five points, except for one clip that has two hazards. You need to score at least 44 out of 75 points to pass the test.
We suggest avoiding the pattern clicking trap. The system detects rhythmic clicking and automatically fails you, so only click when you genuinely spot a hazard developing.
Time your clicks for when hazards first start developing rather than waiting for them to become obvious. The scoring window closes once a hazard becomes apparent to most drivers.
Is there a recommended technique for staying calm and focused during the hazard perception test?
Take deep breaths before each clip begins and remind yourself that you’ve prepared thoroughly. We find that confident candidates perform better because they trust their instincts rather than overthinking every situation.
Focus on the present clip rather than worrying about previous ones. Each scenario is independent, so don’t let one mistake affect your performance on subsequent clips.
Keep your hand relaxed on the mouse and avoid tension in your shoulders. Physical stress can slow your reaction times and make clicking feel awkward or delayed.
Remember that you’re looking for realistic driving scenarios, not trick questions. The test measures practical hazard awareness skills that you’ll use every day as a qualified driver.