How to Check Your Car’s Fluid Levels: A Learner’s Essential Guide
Learning to check your car’s fluid levels is one of those essential skills that every driver needs to master, and it’s often part of your ‘show me’ questions during your driving test. Checking these vital fluids regularly helps prevent costly breakdowns, keeps you safe on the road, and ensures your car runs smoothly for years to come. We know it might seem a bit daunting at first, but once you get the hang of it, these checks become second nature.
The good news is that most fluid checks are surprisingly straightforward and take just a few minutes to complete. You don’t need fancy tools or years of mechanical experience to keep tabs on your engine oil, coolant, brake fluid, and other essential liquids that keep your car running properly.
In this guide, we’ll walk you through everything you need to know about checking each type of fluid with confidence. From understanding why these checks matter so much to mastering the techniques that will impress your driving examiner, we’ve got you covered every step of the way.
Why It’s Vital to Check Your Car’s Fluid Levels
Regular fluid level checks prevent serious engine damage and keep you safely on the road. We’re talking about protecting expensive components, dodging hefty repair bills, and developing skills that’ll serve you throughout your driving life.
Protecting Your Engine and Components
Your engine works incredibly hard, with parts spinning thousands of times per minute. Without proper lubrication from engine oil, these components grind against each other and wear out fast.
Think of oil as your engine’s lifeblood. When levels drop too low, metal parts scrape together without protection. This creates costly damage that could have been avoided with a simple five-minute check.
Coolant prevents engine overheating by absorbing heat and moving it away from critical parts. Low coolant levels mean your engine can’t regulate temperature properly. The result? Warped cylinder heads, blown gaskets, or complete engine failure.
Brake fluid connects your foot to your stopping power. When fluid levels drop, your brakes become spongy or unresponsive. That’s not just expensive to fix – it’s genuinely dangerous.
Power steering fluid makes turning your wheel effortless. Without enough fluid, you’ll struggle to steer, especially when parking or manoeuvring at low speeds.
Each fluid has a specific job protecting different systems. Miss these checks, and you’re gambling with components worth thousands of pounds.
Avoiding Breakdown and Costly Repairs
Nobody wants to be stranded on the roadside with steam pouring from their bonnet. Regular fluid checks catch problems before they leave you calling for recovery.
Engine overheating from low coolant can destroy your engine in minutes. A new engine costs thousands, whilst a bottle of coolant costs a few pounds. The maths speaks for itself.
Low oil levels cause bearing damage, seized pistons, and complete engine failure. These repairs often cost more than the car’s worth, especially on older vehicles.
Brake system problems from contaminated or low fluid create safety risks and expensive repairs. New brake components, lines, and labour can easily reach hundreds of pounds.
Transmission fluid issues lead to rough shifting, slipping gears, and eventual transmission failure. Rebuilding or replacing a gearbox costs thousands and takes your car off the road for days.
We’ve seen drivers ignore simple warning signs only to face massive repair bills later. A few minutes checking fluids saves hours of hassle and huge expenses.
Building Good Car Maintenance Habits
Checking fluid levels teaches you to spot problems early and understand how your car works. These skills make you a more confident, capable driver.
Regular checks help you notice changes in fluid colour, consistency, or levels. You’ll spot leaks, contamination, or wear before they become serious problems.
Good car maintenance habits start with simple tasks like fluid checks. Once you’re comfortable with these basics, you’ll feel more confident tackling other maintenance jobs.
Learning to check fluids builds your mechanical knowledge. You’ll understand what each system does and how they work together to keep your car running smoothly.
These skills save money throughout your driving life. Instead of relying on garages for every small issue, you can handle basic maintenance yourself.
Most importantly, regular fluid checks give you peace of mind. You’ll know your car is safe and reliable, whether you’re driving to work or embarking on a long journey.
Developing these habits now sets you up for years of trouble-free motoring. Your future self will thank you for taking car maintenance seriously from the start.
Getting Ready: Tools and Safety Tips for Checking Fluids
Before we dive into checking your car’s fluids, let’s gather the right tools and learn how to stay safe. You’ll need just a few basic items, know where to find each fluid reservoir, and follow some simple safety rules to protect yourself whilst working around your engine.
Basic Kit Every Driver Should Have
The good news is you don’t need expensive tools to check your car’s fluids. Most items are probably already in your garage or kitchen cupboard.
Essential tools include:
- Clean cloth or paper towels (for wiping the dipstick clean)
- Torch or mobile phone light (engine bays can be quite dark)
- Funnel (makes topping up fluids much easier and prevents spills)
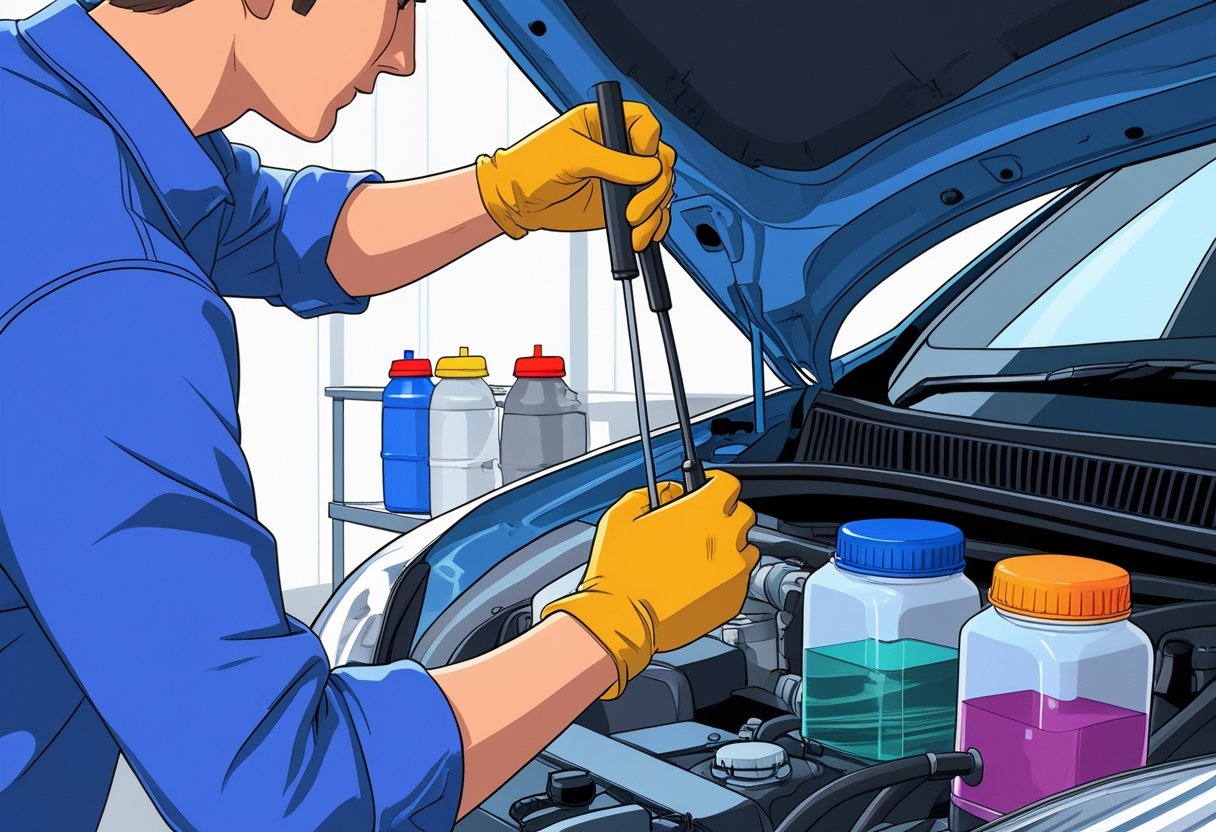
- Disposable gloves (protects your hands from hot or corrosive fluids)
Helpful extras:
- Small notebook (to record fluid levels and dates)
- Measuring jug (for adding precise amounts of fluid)
Keep these items together in a small toolbox or carrier bag in your boot. This way, you’ll always have everything ready when you need to check your fluids.
Many of these tools serve multiple purposes too. That torch will help you read fluid levels clearly, whilst the cloth ensures you get accurate readings from your dipstick every time.
Finding Fluid Reservoirs in Your Car
Each fluid in your car has its own home under the bonnet. Learning where they live makes checking them much quicker and easier.
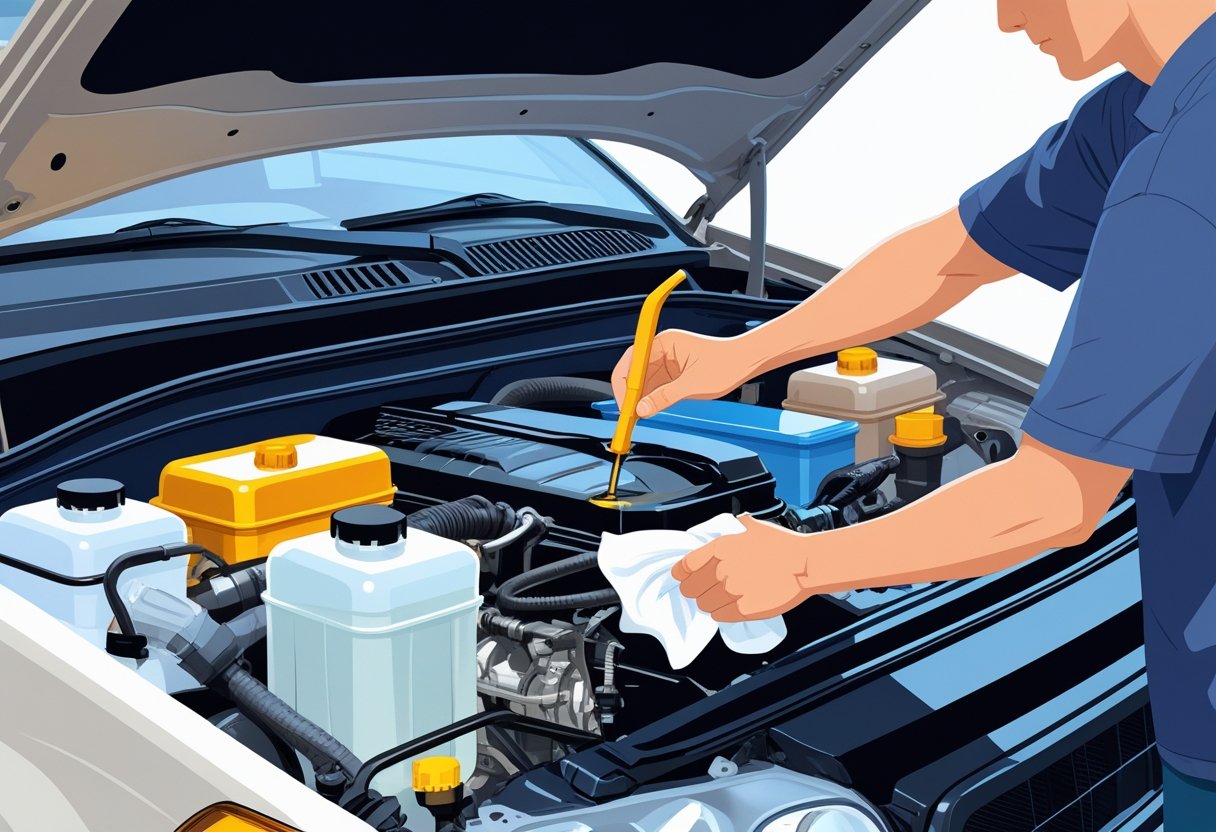
The dipstick is usually a long metal rod with a bright yellow or orange handle. It sits deep in your engine and measures oil levels. Pull it straight up to remove it.
Your brake fluid reservoir looks like a small plastic bottle, often mounted on the driver’s side near the back of the engine bay. It’s typically translucent so you can see the fluid level inside.
The coolant reservoir is usually a larger plastic tank with “MIN” and “MAX” markings on the side. It might be white, translucent, or even black depending on your car.
Your power steering reservoir is often cylindrical with a screw-on cap. Some cars have a dipstick attached to the cap, whilst others have level markings on the outside.
Top tip: Check your owner’s manual for a diagram showing exactly where each reservoir sits in your specific car model.
Staying Safe Under the Bonnet
Car engines get extremely hot and contain fluids under pressure. Following these safety rules protects you from burns and injuries.
Never check fluids on a hot engine. Wait at least 30 minutes after driving before opening your bonnet. Hot coolant can spray out under pressure and cause serious burns.
Always engage your handbrake and turn off the engine completely. Remove the keys from the ignition to prevent any accidental starting.
Wear those disposable gloves. Brake fluid is particularly corrosive and can damage your skin. Engine oil isn’t pleasant on your hands either.
Keep a fire extinguisher nearby if you have one. Whilst rare, fluid leaks near hot engine parts can occasionally cause small fires.
Be gentle with reservoir caps. If you feel resistance when trying to remove a cap, stop and let the engine cool down further. Pressure might still be building inside.
If something doesn’t look right or you smell anything unusual, step away and call a professional. Your safety is always more important than checking fluid levels.
How to Check Your Engine Oil with Confidence
Mastering your engine oil check involves three crucial skills: finding and handling the oil dipstick properly, reading the oil levels with accuracy, and adding oil safely when needed. These steps form the backbone of basic car maintenance that every driver should feel comfortable performing.
Locating and Using the Oil Dipstick
The oil dipstick is your direct window into your engine’s health, and finding it doesn’t have to feel like a treasure hunt. Most dipsticks feature a bright yellow, orange, or red handle that stands out against the engine components.
Look for a long, thin metal rod protruding from the engine block. On many cars, you’ll spot it near the centre or towards one side of the engine bay. Some vehicles hide the dipstick behind plastic covers, so don’t panic if it’s not immediately visible.
Before you start:
- Park on level ground
- Turn off the engine and wait 5-10 minutes
- Engage the handbrake for safety
Pull the dipstick straight up with a firm, steady motion. Some require a slight twist, but most come out with gentle pressure. The metal rod might be longer than you expect, sometimes reaching 60cm or more.
Clean the entire dipstick with a lint-free cloth or kitchen roll. This step is absolutely critical because dirty oil clinging to the rod will give you false readings. We want to see exactly what’s happening inside your engine.
Reading Oil Levels Accurately
Reading your oil dipstick correctly separates confident drivers from those who guess and hope for the best. The bottom of the dipstick contains clear markings that tell the whole story.
You’ll see two distinct markers: minimum (often marked “MIN” or with crosshatching) and maximum (marked “MAX” or “FULL”). Between these points, there might be a textured area or additional lines.
Reinsert the clean dipstick fully until it seats properly. Push it all the way down, ensuring it follows its natural path. Wait a moment, then pull it out again for your reading.
What the oil film tells you:
- Oil should sit between MIN and MAX marks
- Below MIN means immediate action needed
- Above MAX indicates overfilling (equally problematic)
- No oil visible means stop driving immediately
The oil creates a wet film on the metal that’s usually easy to spot. Fresh oil appears amber or black, whilst older oil looks darker and thicker. Don’t worry about slight variations in colour, this is completely normal.
Topping Up: Avoiding Common Mistakes
Adding engine oil seems straightforward, but small mistakes can create expensive problems. The key lies in patience and using the correct oil type for your specific vehicle.
Check your owner’s manual first. Different engines need different oil viscosities (thickness levels). Using the wrong type won’t immediately damage your engine, but it’s not ideal for long-term health.
Locate the oil filler cap, usually marked with an oil can symbol or the word “ENGINE OIL”. Remove it carefully and set it down with the opening facing up to keep dirt out.
The golden rules for adding oil:
- Add small amounts (250ml at a time)
- Wait 5 minutes between additions
- Check the level frequently with the dipstick
- Never exceed the MAX mark
Pour slowly and steadily. Oil takes time to settle into the engine’s lowest points where the dipstick measures. Rushing this process leads to overfilling, which forces oil into places it shouldn’t go.
Stop adding oil when the dipstick shows levels between MIN and MAX, ideally closer to MAX for optimal performance. Replace the filler cap securely and you’re finished.
Mastering Coolant and Antifreeze Checks
Checking your coolant levels is a straightforward skill that prevents expensive engine damage from overheating. We’ll guide you through finding the right reservoir, checking levels safely, and topping up when necessary.
Identifying the Coolant Reservoir
Finding your coolant reservoir might seem tricky at first, but we promise it’s easier than you think! Most cars have the reservoir positioned near the radiator, usually towards one side of the engine bay.
Look for a translucent plastic tank with minimum and maximum level markings clearly visible on the side. The cap typically displays warnings like “never open when hot” or shows a temperature symbol with an exclamation mark.
Your owner’s manual will show the exact location if you’re struggling to spot it. Don’t confuse it with other fluid reservoirs – adding coolant to your brake fluid or screen wash could cause serious damage to your car.
The reservoir connects to your engine’s cooling system through rubber hoses. You might notice these hoses running between the tank and radiator, which helps confirm you’ve found the right component.
Checking Levels When the Engine Is Cold
Safety comes first when checking coolant levels, and that means waiting for your engine to cool completely. We recommend waiting at least 30 minutes after switching off your engine before attempting any checks.
If your car has been running hot or overheating, you’ll need to wait much longer. The cooling system operates under pressure, and opening it whilst hot could result in scalding injuries from pressurised steam.
Once cool, examine the coolant level through the transparent reservoir walls. The fluid should sit between the minimum and maximum markers clearly marked on the tank’s exterior.
What healthy coolant looks like:
- Bright colour (often green, blue, or pink)
- Clear appearance without debris
- Level between min/max lines
Check the surrounding hoses for wet patches or white staining, which indicate potential leaks. These early warning signs help you catch problems before they become expensive repairs.
What to Do If the Coolant Needs Topping Up
When your coolant sits below the minimum line, topping up becomes essential to prevent engine overheating. Remember, modern cars have sealed cooling systems that shouldn’t need regular top-ups unless there’s a leak somewhere.
Use the correct type of antifreeze for your vehicle – different formulations don’t mix well together. Check your owner’s manual or ask at your local motor factors if you’re unsure which type to buy.
Mix antifreeze with water at a 50/50 ratio unless you’re buying pre-mixed coolant. Fill slowly until the level reaches between the minimum and maximum markers, but never exceed the maximum line.
Emergency situations only: If you’re stranded with low coolant, plain water can get you to the nearest garage. However, this dilutes the antifreeze protection and should be corrected as soon as possible.
If you find yourself topping up frequently, there’s likely a leak in your cooling system. Book a garage inspection promptly, as ignoring coolant loss leads to engine overheating and potentially catastrophic damage costing thousands of pounds.
Ensuring Brake Fluid Levels Are Spot On
Your brake fluid keeps you safe on the road, so we need to make sure there’s enough of it and it’s in good condition. We’ll show you exactly where to find the reservoir and what to look for when checking those crucial levels.
Locating the Brake Fluid Reservoir
Finding your brake fluid reservoir is simpler than you might think. We’ll start by opening the bonnet and looking towards the back of the engine bay on the driver’s side.
The brake fluid reservoir sits on top of the master cylinder. It’s usually a small, rectangular container made of translucent plastic that lets you see inside.
On most modern cars, you’ll spot it easily because it has clear “Min” and “Max” markings on the side. The reservoir often has a black or coloured cap with brake fluid symbols or DOT ratings printed on it.
Before you start checking, make sure your car is parked on level ground. The engine should be cool to the touch, not warm from recent driving.
If you’re struggling to locate it, check your owner’s manual. Some cars have the reservoir in slightly different positions, but it’s almost always near the brake master cylinder.
Inspecting Levels for Safety
Now we’re ready to check the actual brake fluid level. Look at the side of the reservoir where you’ll see those “Min” and “Max” lines we mentioned earlier.
Your brake fluid should sit somewhere between these two marks. Never let it drop below the minimum line as this can cause serious braking problems.
The fluid itself should appear amber or light brown in colour when it’s fresh. If you notice it’s gone dark brown or black, that’s a sign it needs changing soon.
Here’s what healthy brake fluid levels look like:
| Level | Action Needed |
|---|---|
| Between Min/Max | Perfect, no action required |
| At minimum line | Top up soon |
| Below minimum | Urgent: Check immediately |
| Above maximum | Don’t overfill, drain excess |
We don’t need to remove the cap unless we’re actually topping up the fluid. Just looking through the translucent plastic tells us everything we need to know.
Signs Your Brake Fluid Needs Attention
Sometimes our brake fluid needs more than just a level check. We need to watch for warning signs that tell us when something’s not quite right.
Colour changes are the first thing to notice. Fresh brake fluid looks clear or amber, but it darkens with age and use. Black or very dark fluid definitely needs replacing.
Low brake fluid levels often mean your brake pads are wearing down. As the pads get thinner, more fluid moves into the brake system to compensate.
Watch out for these warning signs:
- Brake pedal feels spongy or soft
- Pedal travels further to the floor than usual
- Brake warning light appears on your dashboard
- Grinding or squealing noises when braking
If your brake fluid level keeps dropping, don’t just keep topping it up. This usually means there’s a leak somewhere in the system that needs professional attention.
Remember, brake fluid absorbs moisture over time, which reduces its effectiveness. Most manufacturers recommend changing it every two years, regardless of how it looks.
Checking Power Steering Fluid the Right Way
Power steering fluid needs proper checking to keep your steering smooth and avoid expensive repairs. We’ll show you how to locate the reservoir, understand the fluid markings, and safely add fluid when needed.
Finding the Power Steering Reservoir
The power steering fluid reservoir sits somewhere in your engine bay, usually near the belts or towards one side. It’s typically a small plastic container with a distinctive cap that makes it easy to spot.
Look for a cap with a steering wheel symbol or text saying “Power Steering” or “PS Fluid”. The reservoir itself is often made from translucent plastic, letting you peek at the fluid level without opening it.
On most cars, you’ll find it mounted directly on the power steering pump. Some vehicles have it positioned separately for easier access during maintenance checks.
Clean the area thoroughly before opening. Any dirt or debris around the cap can fall into the system and cause damage. We always wipe the cap and surrounding area with a clean cloth first.
If you’re struggling to locate it, check your owner’s manual. Different manufacturers place the power steering reservoir in various spots, and your manual will show you exactly where to look.
How to Read the Fluid Markings
Most power steering reservoirs have markings on the side or a dipstick attached to the cap. These markings show minimum and maximum levels for both hot and cold engine conditions.
Check with a cold engine for safety and accuracy. If you’ve been driving, wait at least 30 minutes before checking. Hot components can burn you, and hot fluid gives different readings.
The dipstick or reservoir will show “MIN” and “MAX” lines. Some also have “HOT” and “COLD” ranges. Use the cold markings when your engine hasn’t been running.
Remove the cap and dipstick (if fitted), clean it completely, then reinsert it fully. Pull it out again for an accurate reading of where the fluid sits against the markings.
Good fluid looks clear or slightly amber. Dark brown or black fluid needs changing. If you spot metal particles or the fluid feels gritty, that signals internal wear and requires professional attention.
The level should sit between the minimum and maximum marks. Below minimum means you need to top up immediately to prevent pump damage.
Safely Topping Up Power Steering Fluid
Never guess which fluid to use. Your owner’s manual specifies the exact type needed. Some cars use dedicated power steering fluid, while others require specific automatic transmission fluid (ATF).
Using the wrong fluid damages seals and internal components. Different fluid types don’t mix well and can create harmful sludge that blocks the system.
Purchase the correct fluid from a motor factors or dealership parts department. Bring your registration number to ensure you get exactly the right specification for your car.
Use a small funnel to avoid spills when topping up. Pour slowly and check the level frequently. We add small amounts at a time to prevent overfilling, which can cause pressure problems.
Fill only to the maximum mark, never beyond. Hot fluid expands, and overfilling can burst seals or create leaks. Stop as soon as you reach the “MAX” line on your reservoir.
Replace the cap securely and clean up any spills immediately. Power steering fluid can damage paintwork and harm the environment if not handled properly.
Transmission Fluid: What Every Learner Should Know
Your car’s transmission fluid keeps gears shifting smoothly and prevents costly breakdowns. Learning to spot warning signs of low fluid levels and checking them properly will help you catch problems early and maintain your vehicle’s health.
Recognising Symptoms of Low Transmission Fluid
When transmission fluid runs low, your car sends clear warning signals that we shouldn’t ignore. The most noticeable sign is rough or delayed gear changes, particularly when accelerating from a standstill.
You might hear unusual whining or grinding noises coming from beneath the bonnet. These sounds often become more pronounced when the engine is running and the car is in gear.
Common warning signs include:
- Slipping gears or hesitation during acceleration
- Strange metallic grinding or whining sounds
- Burning smell from the engine bay
- Puddles of red or dark fluid under your parked car
The transmission may also overheat more easily when fluid levels drop. This can trigger warning lights on your dashboard or cause the gearbox to feel sluggish during normal driving.
If you notice any of these symptoms, it’s crucial to check your transmission fluid immediately. Driving with low levels can cause permanent damage that costs hundreds or thousands to repair.
When and How to Check Transmission Fluid
We recommend checking transmission fluid monthly, ideally when the engine is warm after a short drive. Unlike engine oil, transmission fluid must be checked with the engine running and the car parked on level ground.
Follow these steps for accurate checking:
- Warm the engine by driving for 10-15 minutes
- Park on level ground and leave the engine idling
- Locate the transmission dipstick (usually marked with a yellow or red handle)
- Pull out the dipstick and clean it thoroughly with a cloth
Insert the dipstick fully back into the tube, then remove it again to read the fluid level. The fluid should sit between the minimum and maximum marks on the dipstick.
Check the fluid’s colour and consistency too. Healthy transmission fluid appears bright red and feels smooth. Dark brown or black fluid with a burnt smell indicates it needs changing immediately.
Never check transmission fluid when the engine is cold, as this gives inaccurate readings that could lead to overfilling.
Other Essential Fluids to Keep Your Car Road-Ready
Beyond the main fluids like engine oil and coolant, your car relies on several other liquids to function properly. These include screenwash for clear visibility and specialised fluids for your battery and clutch system.
Windscreen Washer Fluid Made Simple
Checking your windscreen washer fluid is one of the easiest maintenance tasks we can tackle. This fluid keeps our view crystal clear when dirt, insects, or weather conditions cloud our windscreen.
The washer fluid reservoir is typically a translucent plastic container in the engine bay. It’s marked with a windscreen and wipers symbol, making it easy to spot.
Checking the level:
- Look at the side of the reservoir
- The fluid level should be visible through the plastic
- Top up if it’s below the minimum line
We can buy ready-mixed screenwash from any petrol station or car parts shop. Some people make their own using water and washing-up liquid, but proper screenwash works better in cold weather.
What to look for:
- Colour: Most screenwash is blue, pink, or yellow
- Clarity: Should be clean, not cloudy
- Smell: Pleasant, soapy scent
Simply pour the screenwash into the reservoir until it reaches the maximum line. Don’t overfill it, as the fluid needs room to expand.
The Role of Battery and Clutch Fluids
Battery and clutch fluids play vital roles in keeping our cars running smoothly. These systems need proper fluid levels to work effectively during our driving test.
Battery fluid is only relevant for older, non-sealed batteries. Most modern cars have maintenance-free batteries that don’t need checking. If we have an older battery with removable caps, the fluid inside should cover the metal plates. We’d use distilled water to top up if needed.
Clutch fluid shares the same reservoir as brake fluid in most cars. This hydraulic fluid transfers the pressure from our clutch pedal to the clutch mechanism.
Key points for clutch fluid:
- Same checking method as brake fluid
- Should be clear, not dark or cloudy
- Level drops slowly over time
- Low levels make gear changes difficult
If we notice the clutch pedal feels spongy or gear changes become tricky, the fluid level might be low. However, clutch problems often need professional attention, so we shouldn’t hesitate to seek help from a qualified mechanic.
Frequently Asked Questions
Checking your car’s fluids properly involves understanding engine oil dipstick readings, monitoring coolant levels monthly, and recognising when brake fluid appears dark or contaminated. Let me walk you through the most common questions we hear about fluid checks during driving tests.
What’s the best way to ensure my car’s engine stays healthy through regular fluid checks?
We recommend checking your engine oil monthly when the car’s been parked on level ground for at least five minutes. This gives the oil time to settle back into the sump.
Pull out the dipstick completely and wipe it clean with a cloth or tissue. Push it all the way back in, then remove it again to get an accurate reading.
The oil level should sit between the minimum and maximum marks. If it’s below the minimum line, you’ll need to top up immediately.
Check your coolant reservoir when the engine’s completely cold. The fluid should be between the min and max lines on the translucent tank.
Could you guide me through the steps to accurately assess my vehicle’s oil level?
Start with your engine switched off and the car parked on flat, level ground. Wait at least five minutes after driving to let the oil settle properly.
Locate the dipstick (it usually has a bright yellow or orange handle). Pull it straight out and clean it thoroughly with a rag.
Insert the dipstick all the way back into its tube until it’s fully seated. Give it a moment, then pull it out again for your reading.
Look for the oil film on the stick. The level should be between the minimum and maximum notches or crosshatched area.
I’m keen to know, how often should I be topping up my car’s coolant to avoid overheating?
You shouldn’t need to top up coolant frequently if your system’s working properly. Check the level monthly, but only add coolant if it drops below the minimum mark.
Always check coolant when the engine’s stone cold, never when it’s hot or warm. The reservoir should be clearly visible under your bonnet.
If you’re constantly topping up coolant, there’s likely a leak somewhere in the system. This needs professional attention straight away.
Most cars use a 50/50 mixture of antifreeze and water. Never add plain water on its own, especially in winter months.
What’s the trick to checking my car’s brake fluid without getting it wrong?
Find the brake fluid reservoir near the back of the engine bay. It’s usually a small, translucent plastic container with a screw-on cap.
The fluid level should sit between the minimum and maximum lines marked on the side. You don’t need to remove the cap to check this.
Fresh brake fluid appears clear or slightly amber. If it looks dark brown or black, it needs changing regardless of the level.
Never ignore low brake fluid levels. This could indicate worn brake pads or a dangerous leak in your braking system.
Could you enlighten me on checking my vehicle’s power steering fluid with ease?
Locate the power steering reservoir, which often has a steering wheel symbol on the cap. Some cars have a dipstick attached to the cap itself.
Check the fluid when the engine’s warm but switched off. The level should be between the min and max marks.
Power steering fluid is usually red or amber coloured when fresh. Dark, dirty fluid suggests it needs changing.
If you’re hearing whining noises when turning the steering wheel, low power steering fluid might be the culprit.
What are the signs that my car’s transmission fluid might need a top-up or a change?
Many modern cars have sealed transmission systems that don’t require regular checking. However, some still have a dipstick similar to the oil one.
Check transmission fluid when the engine’s warm and running, with the car in park. The fluid should be bright red and smell slightly sweet.
Dark brown or black transmission fluid with a burnt smell needs immediate attention. This indicates serious internal wear.
If you’re experiencing rough gear changes or slipping gears, low or contaminated transmission fluid could be the cause.